Opencv GUI相关操作
1.图片
1.1 加载图片
Mat cv::imread    (
const   String &     filename,
int     flags = IMREAD_COLOR
)
第一个参数为图像路径,第二个为加载图像的模式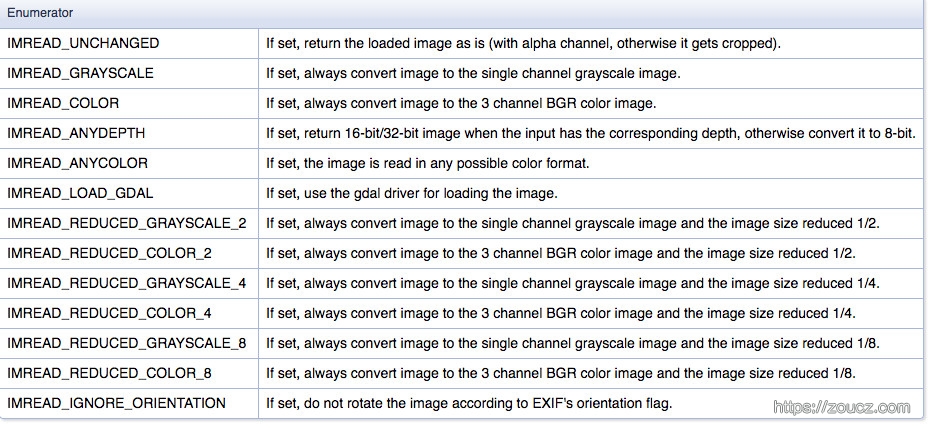
这里值得注意的是,当传入的图像路径是一个错误的路径时,此函数并不会抛异常,而是返回一个None值(python API)
1.2 显示图像
void cv::imshow    (
const String &     winname, //窗口名称
InputArray     mat      //图像数据
)
值得注意的是cv2.imshow并不会阻塞程序,也就是说如果程序执行完毕,则图像窗口就会被关闭,需要结合函数cv2.waitKey来使用
int cv::waitKey    (int delay = 0)
int cv::waitKeyEx(int delay = 0)//Similar to waitKey, but returns full key code.
等待delay时间,或者按下任意按键后继续程序,并返回按键码
完整示例:
cv2.namedWindow('image', cv2.WINDOW_NORMAL)
cv2.imshow('image',img)
cv2.waitKey(0)
cv2.destroyAllWindows()
相对于imshow提供的简单图像显示方法,用的更多的是matlablip库强大的显示功能,后面更多的也是使用这个库来做一些显示的操作
import numpy as np
import cv2
from matplotlib import pyplot as plt
img = cv2.imread('messi5.jpg',0)
plt.imshow(img, cmap = 'gray', interpolation = 'bicubic')
plt.xticks([]), plt.yticks([])  # to hide tick values on X and Y axis
plt.show()
这里要注意的是,opencv读取图像默认的通道顺序为bgr,MATLAB显示的时候默认是rgb,需要用cv2的cvtColor转换一下通道顺序再显示。
1.3 保存图像
cv2.imwrite('messigray.png',img)
2. 视频
2.1 从摄像头读取视频
opencv提供了VideoCapture工具来从摄像头读取视频,示例代码:
import numpy as np
import cv2
cap = cv2.VideoCapture(0)
while(True):
    # Capture frame-by-frame
    ret, frame = cap.read()
    # Our operations on the frame come here
    gray = cv2.cvtColor(frame, cv2.COLOR_BGR2GRAY)
    # Display the resulting frame
    cv2.imshow('frame',gray)
    if cv2.waitKey(1) & 0xFF == ord('q'):
        break
# When everything done, release the capture
cap.release()
cv2.destroyAllWindows()
cap.read的返回值,第一个bool,标记是否正常返回帧,第二个为mat,帧数据
可以调用cap.isOpened()检查一下摄像头是否打开,如果为false,可以调用cap.open()打开摄像头
可以通过cap.get和cap.set函数来读取,修改视频属性
virtual double cv::VideoCapture::get (int propId)const
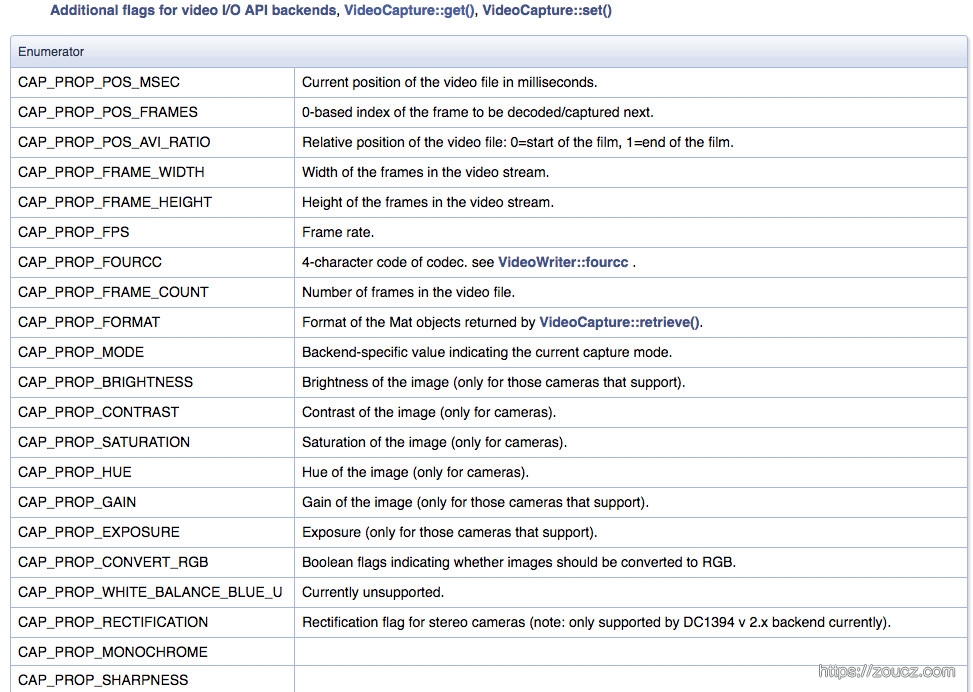
virtual bool cv::VideoCapture::set(int propId,double value)
例如可以用来修改视频尺寸等
2.2 从文件读取视频
import numpy as np
import cv2
cap = cv2.VideoCapture('vtest.avi')
while(cap.isOpened()):
    ret, frame = cap.read()
    gray = cv2.cvtColor(frame, cv2.COLOR_BGR2GRAY)
    cv2.imshow('frame',gray)
    if cv2.waitKey(1) & 0xFF == ord('q'):
        break
cap.release()
cv2.destroyAllWindows()
2.3 保存视频
opencv提供了videoWriter函数来保存视频
cv::VideoWriter::VideoWriter    (
const String &     filename, //文件名
int     fourcc, //编解码器配置
double     fps, //保存帧率
Size     frameSize, //视频尺寸
bool     isColor = true //正常还是灰度
)
其中,编解码器需要使用单独的函数来初始化,且是平台相关的,在fourcc.org上可以找到详细的说明
- Fedora: DIVX, XVID, MJPG, X264, WMV1, WMV2. (XVID is more preferable. MJPG results in high size video. X264 gives very small size video)
- Windows: DIVX (More to be tested and added)
- OSX: MJPG (.mp4), DIVX (.avi), X264 (.mkv).
获取编解码器配置值的方法,比如MJPG:cv2.VideoWriter_fourcc('M','J','P','G')或cv2.VideoWriter_fourcc(*'MJPG')
从摄像头读取视频并保存示例:import numpy as np import cv2 cap = cv2.VideoCapture(0) # Define the codec and create VideoWriter object fourcc = cv2.VideoWriter_fourcc(*'XVID') out = cv2.VideoWriter('output.avi',fourcc, 20.0, (640,480)) while(cap.isOpened()): ret, frame = cap.read() if ret==True: frame = cv2.flip(frame,0) # write the flipped frame out.write(frame) cv2.imshow('frame',frame) if cv2.waitKey(1) & 0xFF == ord('q'): break else: break # Release everything if job is finished cap.release() out.release() cv2.destroyAllWindows()
3. 绘图函数
3.1 线段
cv2.line,需要传入起点、终点、颜色、粗细
import numpy as np
import cv2
# Create a black image
img = np.zeros((512,512,3), np.uint8)
# Draw a diagonal blue line with thickness of 5 px
cv2.line(img,(0,0),(511,511),(255,0,0),5)
3.2 矩形
画矩形,传入左上角、右下角、颜色、粗细
cv2.rectangle(img,(384,0),(510,128),(0,255,0),3)
3.3 圆形
传入圆心、半径、颜色、线段粗细,若粗细是负数,则代表填充的圆形
cv2.circle(img,(447,63), 63, (0,0,255), -1)
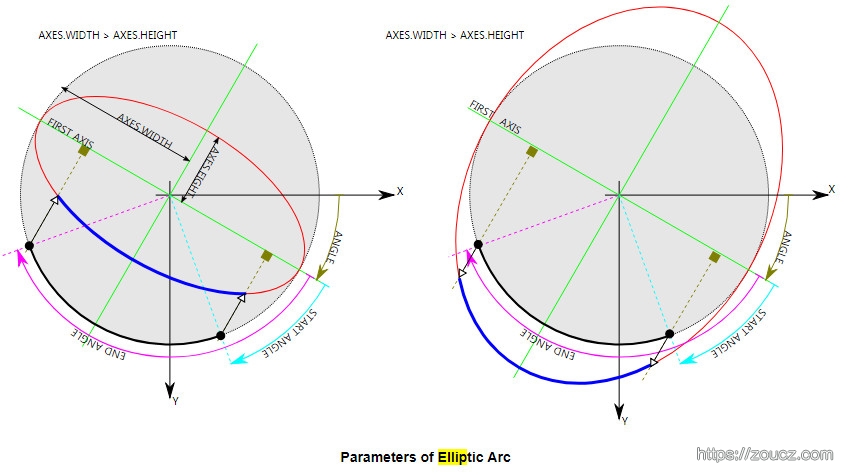
3.4 椭圆
椭圆参数比上面的多一些,函数定义及图示如下
void cv::ellipse    (
InputOutputArray     img, //输入图
Point     center, //圆心坐标
Size     axes, //长轴、短轴
double     angle,
double     startAngle,
double     endAngle,
const Scalar &     color,
int     thickness = 1,
int     lineType = LINE_8,
int     shift = 0
)
3.5 多边形
void cv::polylines    (
InputOutputArray     img, //输入
InputArrayOfArrays     pts, //顶点列表
bool     isClosed, //是否闭合
const Scalar &     color, //颜色
int     thickness = 1, //粗细
int     lineType = LINE_8, //线段类型
int     shift = 0 //顶点坐标中的小数位数
)
pts = np.array([[10,5],[20,30],[70,20],[50,10]], np.int32)
pts = pts.reshape((-1,1,2))
cv2.polylines(img,[pts],True,(0,255,255))
3.6 文字
void cv::putText    (
InputOutputArray     img, //输入图
const String &     text, //文字内容
Point     org, //文字左下角坐标
int     fontFace,//字体
double     fontScale,//大小
Scalar     color,//颜色
int     thickness = 1,//线段粗细
int     lineType = LINE_8,//线段类型
bool     bottomLeftOrigin = false //为true时,文字坐标原点在左下角,否则在左上角(py版本默认左下角)
)
font = cv2.FONT_HERSHEY_SIMPLEX
cv2.putText(img,'OpenCV',(10,500), font, 4,(255,255,255),2,cv2.LINE_AA)
绘图函数还有很多,详见文档。
4. 鼠标事件
通过这种方式查看opencv支持的事件名称
import cv2
events = [i for i in dir(cv2) if 'EVENT' in i]
print( events )
示例:监听鼠标双击事件,在双击的位置画一个圆
import cv2
import numpy as np
# mouse callback function
def draw_circle(event,x,y,flags,param):
    if event == cv2.EVENT_LBUTTONDBLCLK:
        cv2.circle(img,(x,y),100,(255,0,0),-1)
# Create a black image, a window and bind the function to window
img = np.zeros((512,512,3), np.uint8)
cv2.namedWindow('image')
cv2.setMouseCallback('image',draw_circle)
while(1):
    cv2.imshow('image',img)
    if cv2.waitKey(20) & 0xFF == 27:
        break
cv2.destroyAllWindows()
一个复杂一点的示例,综合多个鼠标、键盘事件,实现画矩形或小圆点的操作
import cv2
import numpy as np
drawing = False # true if mouse is pressed
mode = True # if True, draw rectangle. Press 'm' to toggle to curve
ix,iy = -1,-1
# mouse callback function
def draw_circle(event,x,y,flags,param):
    global ix,iy,drawing,mode
    if event == cv2.EVENT_LBUTTONDOWN:
        drawing = True
        ix,iy = x,y
    elif event == cv2.EVENT_MOUSEMOVE:
        if drawing == True:
            if mode == True:
                cv2.rectangle(img,(ix,iy),(x,y),(0,255,0),-1)
            else:
                cv2.circle(img,(x,y),5,(0,0,255),-1)
    elif event == cv2.EVENT_LBUTTONUP:
        drawing = False
        if mode == True:
            cv2.rectangle(img,(ix,iy),(x,y),(0,255,0),-1)
        else:
            cv2.circle(img,(x,y),5,(0,0,255),-1)

img = np.zeros((512,512,3), np.uint8)
cv2.namedWindow('image')
cv2.setMouseCallback('image',draw_circle)
while(1):
    cv2.imshow('image',img)
    k = cv2.waitKey(1) & 0xFF
    if k == ord('m'):
        mode = not mode
    elif k == 27:
        break
cv2.destroyAllWindows()
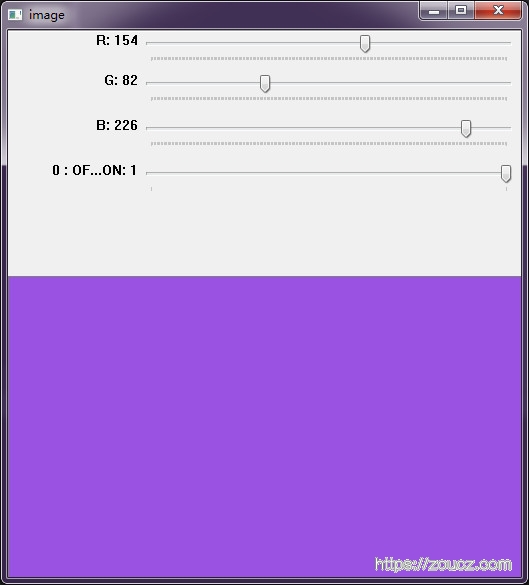
5. 滚动条组件
创建滚动条函数
int cv::createTrackbar    (
const String &     trackbarname, //滚动条名称
const String &     winname,//窗口名称
int *     value, //滑块当前位置
int     count,//最大值
TrackbarCallback onChange = 0,//回调函数
void *     userdata = 0 //传给回调的用户数据
)
获取滚筒条当前值
int cv::getTrackbarPos    (
const String &     trackbarname,
const String &     winname
)
示例:通过滚动条创建一个调色板,并创建一个开关
import cv2
import numpy as np
def nothing(x):
    pass
# Create a black image, a window
img = np.zeros((300,512,3), np.uint8)
cv2.namedWindow('image')
# create trackbars for color change
cv2.createTrackbar('R','image',0,255,nothing)cv2.createTrackbar('G','image',0,255,nothing)
cv2.createTrackbar('B','image',0,255,nothing)
# create switch for ON/OFF functionality
switch = '0 : OFF \n1 : ON'
cv2.createTrackbar(switch, 'image',0,1,nothing)
while(1):
    cv2.imshow('image',img)
    k = cv2.waitKey(1) & 0xFF
    if k == 27:
        break
    # get current positions of four trackbars
    r = cv2.getTrackbarPos('R','image')
    g = cv2.getTrackbarPos('G','image')
    b = cv2.getTrackbarPos('B','image')
    s = cv2.getTrackbarPos(switch,'image')
    if s == 0:
        img[:] = 0
    else:
        img[:] = [b,g,r]
cv2.destroyAllWindows()
本文链接:https://www.zoucz.com/blog/2019/03/03/60ab1e60-3d61-11e9-9947-3d7b79f522a2/
